email: tony@lathes.co.uk
Home   Machine Tool Archive   Machine-tools for Sale & Wanted
Manuals   Machine Tool Catalogues   Belts   Books   Accessories

lathes.co.uk
The Lathe
Fitting a Chuck and Making a Backplate
Parts Home Page

Screwcutting    Countershafts    Backgear    The Watchmaker's Lathe   

Tumble Reverse   Quick-change Toolholders   Fitting a Chuck   

Spindle Nose Fittings    More Names of Parts   Epicyclic Backgears

Stuck Chuck   Countershafts, Jackshafts & Spindle Speeds   Oiling

   Reading Microscopes, Bevel Protractors, Combination Squares
and using Calipers & Dividers, etc.

Be sure to click the hyperlinks above for a complete picture
of how a lathe and associated equipment functions


Some lathes ( especially larger ones) often have chucks with integral threads or other mounting mechanisms - Long-nose Taper, Camlock, ISO, etc. - but most small lathes (and older larger ones) use a simple "backplate" where a suitably threaded disc - preferably made from drawn cast iron - is screwed on (or otherwise attached) to the spindle nose and then turned very carefully so that a spigot, raised in its centre, will fit closely into a recess in the back of the chuck. At all costs avoid steel backplates; they can bruise or otherwise damage the spindle nose and, if they become stuck, will be much more difficult to remove.
Contrary to popular belief, the bolts that pass through the backplate and screw into the body of the chuck do not provide a location - they simply clamp the two components together; the alignment of the chuck on the backplate  (and hence its position relative to the centre line of the headstock spindle) depends upon the spigot,  (machined on the backplate), being made a very close fit within the chuck body.
A further important consideration concerns the surfaces of the backplate and chuck that come into hard contact with each other. This is determined (of course) by which surfaces the mounting bolts pass through - and can be either on the raised outer ring (annulus) of the chuck, or the circle formed inside it. Whichever surfaces come into contact make sure that the other two (non-contact surfaces) have a little clearance between them - about 0.025" (0.5 mm) is sufficient - in other words, the depth of the spigot must not be too deep, nor too shallow.
Needless to say, if you have more than one chuck each will require fitting to its own backplate.

3-jaw chuck with backplate fitted

3-jaw chuck without backplate

Backplate

Mounting a New Chuck

1. Make sure that the threads of the (cast-iron) backplate and spindle are thoroughly cleaned and very lightly oiled. Screw the backplate on firmly, using hand pressure only.

2. Before machining starts find a suitable bar, mount it between centres and allow the tailstock to apply a little pressure towards the headstock. Doing this will eliminate any spindle end-play (if it exists) - a vital requirement when making very accurate facing cuts.

3. Use a pair of inside calipers to measure the diameter of the recess in the back of the chuck; transfer this measurement to a pair of outside calipers and machine a spigot that is oversize by about 1/64" (0.5 mm); if you doubt your skill to do this, simply leave the spigot a little larger.
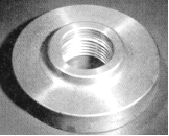
The face of the backplate that the chuck pulls up against must be dead flat; once the oversize spigot has been formed spend several minutes raising just "dust" across this surface to make sure that it is as flat and as smooth as possible. You might want to test this by running a dial-test indicator over it; ideally, the run-out should not exceed 0.0002" (0.005 mm).

4. At the junction of the "flange face" and the "vertical wall" of the spigot (Fig. 2), a small
undercut should be made. This will allow the finishing cuts on the wall to be taken right down so that there is no interference between the "corners" on the backplate and those on the chuck..

5. Before the last cuts are taken, the turning tool should be changed for one shaped so that it will cut down the wall of the spigot - the tool being moved backwards and forwards along the lathe bed, not across.
It's very easy to get the size of the spigot approximately right, but the final cuts, when its diameter is approaching the size that will allow it to be pressed firmly into the back of the chuck, must be taken very carefully indeed - only "dust" should be raised from the surface by the cutting tool.
The chuck should be tried for fit after each pass of the tool - and remember, the one deeper cut made to save time will be the one that ruins the job. As the tool reaches the bottom of the spigot wall allow it to enter the previously-formed undercut section. 
As an alternative to using the whole carriage to move the cutting tool, some experienced turners suggest using the top slide only; this is done by locking the carriage to the bed and ensuring that, when the top slide is set on its zero mark, it cuts parallel - a test cut on some other material to verify this will be time well spent.

6. Leave the chuck on a hot radiator for an hour to expand it slightly before starting the machining operation; if you decide to do this, remember to pick it up whilst wearing an insulated glove - and don't overdo the heating, otherwise you will have a difficult-to-remove "shrink" fit rather than one that can be assembled with a firm push or a very light tap with a hide-faced mallet.
If time is short put the chuck into a strong plastic bag and lower it into a bucket of hot water for 10 minutes.

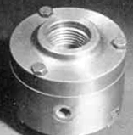
7. When the backplate is the correct size, mark out and drill the bolt holes. This is easily done if engineers' blue, or a smear of red-oxide paint (or even chalk) is put on the backplate before fitting it to the chuck; when the plate is removed the location of the bolt holes will be apparent. Carefully mark out and drill the holes so that, as the bolts pass through the backplate, there is no possibility of them touching the sides and straining the backplate out of line; make them at least 1/16" (1.5 mm) oversize on diameter.
As final check make sure that the mounting bolts do not bottom out in their tapped holes and that chuck and backplate are drawn solidly together.

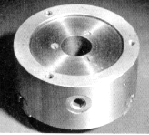
8. If the backplate is a larger than the chuck, finish turn it to the chuck-body diameter and, for safety, radius the rear edge; when this is done, scribe a fine line across the chuck body and backplate so that, when the chuck is removed for dismantling and cleaning, it can be replaced in the same position.

9. If your 3-jaw chuck has two or more key holes, one of them may have a circle, or other mark, stamped alongside it to show that it should used for final tightening. As a chuck wears it is not unknown for one of the other key holes to provide a more accurate grip.

10. If you check the accuracy of your new chuck, make sure that you use a piece of precision ground bar and mount the magnetic base (or other device)  holding the dial-test indicator onto the lathe bed, not the saddle or compound slide rest. Chuck makers cover their backs by quoting pessimistic figures for alignment - typically 0.005"  two inches away from the jaws; in practice, a good chuck can be within 0.001" at this distance, or even better - but you will not find anyone willing to guarantee it.

11. When using the chuck remember its intended purpose - a precision work-holding device: it is not a Record No. 32 all-steel bench vice. The most common fault found on 3-jaw chucks (apart from wear) is one or more broken jaw threads caused by over-tightening when opened out to maximum capacity.

12. If you can afford it, have two 3-jaw chucks in operation; one for "rough" work, to take the stress and strains of heavy use, the other employed only for the finest finishing of materials already part-machined. By doing this you will always have one chuck that remains an accurate, easily-used and reliable work holder..


Making a Backplate for a Screwed Spindle Thread
Unfortunately there are several factors that combine to make this a rather more difficult task than it at first appears. Because the diameter and pitch of a spindle-nose thread is often not to a "standard" (and combined with wear in use), machining a thread inside a backplate to match it can be tricky - unless the spindle is removed from the lathe and is used to check the job as it progresses. You can't remove the job from the lathe and try it on the spindle - once removed,  it can never be replaced with sufficient accuracy for a cut to start where it left off.
Of course, if spindle thread is a Whitworth or metric standard you may be able to locate a tap of the appropriate size and find that a thread cut with is perfectly satisfactory; however, large-diameter taps are hard to find, and expensive.
There is one well-known technique that will enable an accurate measurement of the thread diameter to be made and the problem of making a backplate with accurate threads solved.
The "3-wire method"
This makes use of freely-available brazing rods. A diameter of rod needs to be chosen so that, once in position it protrudes just above thread crests. The illustration below should make it clear as to the shape to be used - this cleverly allowing the wire to stay in place whilst readings are being taken. Using a micrometer measure the diameter over the wires at six points along the length of the thread and average the result.
If a sketch is now produced showing:

  • the length of the thread -
  • the length and diameter of any plain "register" inboard of the thread -
  • the number of pitches per inch (or mm pitch) -
  • the thread angle (usually 55 or 60 degree) -
  • the average diameter over the two "3-wires" -
a skilled turner should - having possession of the wire - be able to reproduce the thread accurately.
Of course, as mentioned earlier, if the spindle can be removed from the lathe and tried into the backplate as work progresses, the whole process is made so much easier.
A note on the "register" of the spindle end  might also appropriate - the register being that small length of finely-finished plain shaft between the thread and the abutment face. Although by its name one might assume this to be a critical part of the assembly it appears that this might not be the case and could have no bearing on the accuracy of the backplate-to-spindle fitting. So, is the register all-important? Well, I thought so - until a Boxford that was passing through my hands was discovered to be fitted with a chuck where the register had been machined out to the root depth of the thread. Despite this "deficiency" the lathe turned with perfect accuracy - even deep cuts failing to have any detrimental effect. As this caused something of a discussion to develop, as an experiment a brand-new Burnerd chuck with a close-fit  register was fitted and tested on the Boxford- and absolutely difference in performance could be detected. Most "vintage" lathes, even very large ones, had no register at all, their chucks just screwing on until the abutment face was reached - and these too were perfectly accurate.
The answer may be that, once on tightly the chuck will always - unless the thread is "drunken" or worn - seat into the same position. Naturally, if you want to go with the "Register-is-all-important" school of thought then no harm will result in following it. Of course, a thread is a poor way of mounting a chuck and the several alternatives, some of which can be seen here, are a great improvement.
If a chuck is stuck--click here for advice.
Tony Griffiths

3-wire method of duplicating thread dimensions

Parts Home Page

Screwcutting    Countershafts    Backgear    The Watchmaker's Lathe   

Tumble Reverse   Quick-change Toolholders   Fitting a Chuck   

Spindle Nose Fittings    More Names of Parts   Epicyclic Backgears

Stuck Chuck   Countershafts, Jackshafts & Spindle Speeds   Oiling

   Reading Microscopes, Bevel Protractors, Combination Squares
and using Calipers & Dividers, etc.

Be sure to click the hyperlinks above for a complete picture
of how a lathe and associated equipment functions


The Lathe
Fitting a Chuck and Making a Backplate
E-MAIL   Tony@lathes.co.uk
Home    Machine Tool Archive    Machine-tools for Sale
Machine Tool Manuals   Machine Tool Catalogues   Belts