 |
|
|
|
|
|
|
|
|
|
|
|
|
|
|
|
|
|
|
|
|
|
|
|
|
|
|
|
|
|
|
|
|
|
|
|
|
|
|
|
|
|
|
|
|
|
|
|
|
|
|
|
|
|
|
|
|
|
|
|
|
|
|
|
|
|
|
|
|
|
|
|
|
|
|
|
|
|
|
|
|
|
|
|
|
|
|
|
|
|
|
|
|
|
|
|
|
|
|
|
|
|
|
|
|
|
|
|
|
|
|
|
|
|
|
|
|
|
|
|
|
|
|
|
|
|
|
|
|
|
|
|
|
|
|
|
|
|
|
|
|
|
|
|
|
|
|
|
|
|
|
|
|
|
|
|
|
|
|
|
|
|
|
|
|
|
|
|
|
|
|
|
|
|
|
|
|
|
|
|
 |
|
|
|
|
 |
|
|
|
|
|
|
|
|
|
Painted at first in a strange, tiger-like, mottled yellow-and-black finish (known as "craquellee" in German) the astonishingly conceived and beautifully-made UWG1 and UWG2 Universal
Multi-purpose Machine Tools were manufactured first by the Hommel Company in Mannheim, Germany, until the early 1970s. With sales having fallen to uneconomic levels, production was taken over by "Hommel-Hercules" and Walter Foerster. The design, almost certainly dating from the 1930s, was by Hans Luce, then working at the Rheinmetall-Borsig company in Sömmerda. This original machine was adapted by the Swiss Meyer & Burger Company and marketed by them, through Astobe A. Stoeckle, as the Astoba and also built in East Germany under communist control as a version of the "Unispan".as the and also built in East Germany under communist control as a version of the "Unispan".
During WW2, Luce was employed at the German Rheinmetall-Werke (tanks & guns) factory and then, in the immediate post-war period, struck out on his own with an engineering office in southern Germany. Here, he developed a sales and manufacturing contract with the Hommel company, an organisation he may previously have come across during his war-time work, Hommel having strong connections with the German military. Indeed, many of the later and larger UWG 2 machines now in private hands came originally from the country's air force.
In German vernacular the machine was an "Eierlegende Wollmilchsäue" or, literally translated, "egg-laying wool-milk-pig" - a machine that could do everything. From its appearance it would appear to have been designed as the sort of "lathe" that might have found a ready home in a boat, mobile maintenance unit or the cramped workshop of a self-employed instrument or clock maker. Even today, a journey to remote seas in a small craft would be made much safer if a Hommel, together with a suitable supply of materials, was on board. The total number of machines made is not known; however, one manufactured in 1952 was stamped 650 and, should that represents a production number, would indicate yearly volumes at a relatively low level; if any reader with a knowledge of the company's background can provide further information, a set of detailed photographs, or copies of the manufacture's literature, the writer would be very pleased to hear from you.
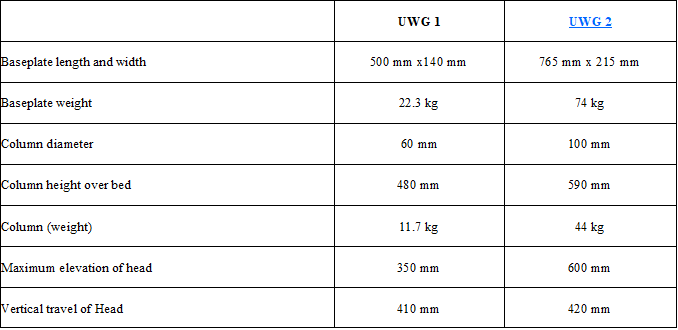
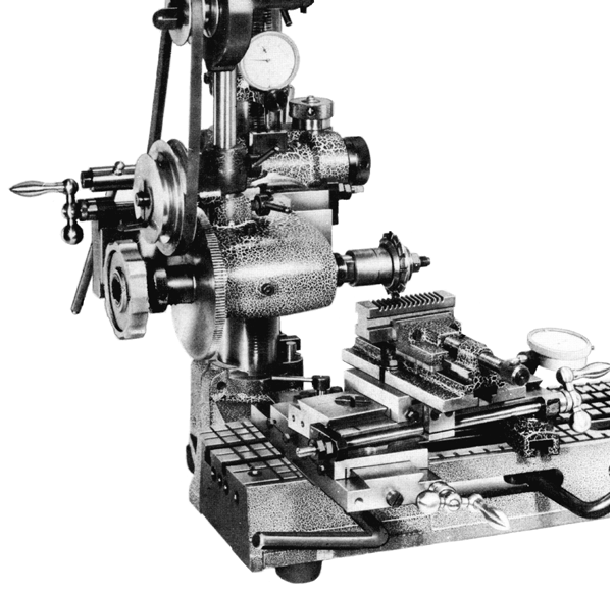
Two models were made, the UWG1 (an early version of which is featured on these pages) and the much larger UWG2, a model readily identifiable by the 6 slots cut into the front face of its base plate; for a comparison, see the table at the bottom of this page. All but a few of the many accessories are transferable between the machines, so easing the problem of finding these desirable and expensive items.
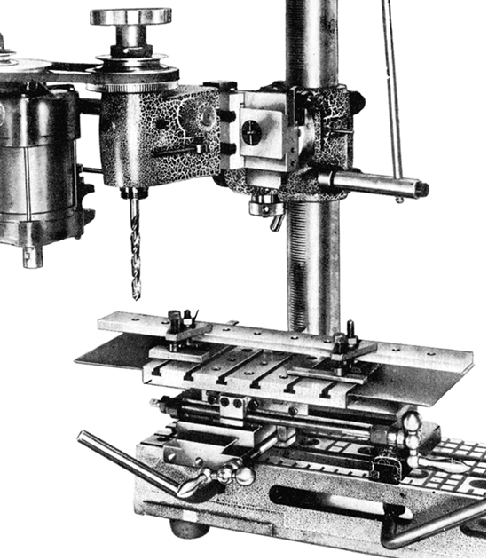
A rectangular cast-iron plate 20-inches (500 mm) long, 6-inches (150 mm) wide and 3-inches (76 mm) deep formed the basis of the machine. At the back, a 6-inch deep extension at the left-hand end carried a boss from which protruded an 18-inch long (457 mm) vertical steel bar; surprisingly, the machine was not intended to be fastened down, but instead rested on five small rubber-tipped feet each about the size of a door stop - one at each corner of the base plate, with a fifth at the back directly underneath the heavy vertical column. By using the base and column to mount combinations of a headstock, tailstock, compound slide rest, T-slotted boring table, rotary table (and numerous other accessories) the assembly could be used as a plain-turning or screwcutting 3.5 inch (90 mm) centre height by 14 inches (360 mm) between-centres lathe, high-speed sensitive drill, vertical and horizontal miller, jig borer, shaper, gear cutter, grinder, engraver, slotter, metal saw or surface table. Because the machine was so well made, and the design so thoroughly considered (and the number and range of its swivel movements so great) the Hommel was able to accomplish many of its functions to the same standards as dedicated, stand-alone machines - its ability being limited only by its rather small size.
In order to make the unit as compact as possible the base was made relatively shallow and hence there was insufficient room to reach in and tighten nuts to hold components in place; instead, a simple but ingenious (though crude-looking) system was employed whereby levers protruded though slots in the front face of the plate and tightened them in place by a powerful cam action. The headstock and tailstock, when in position for use as a lathe, were not locked by the eccentric levers but each fitted with a single and slow-to-operate round-headed bolt (with holes for a Tommy bar) that acted on T-nuts to draw them down onto the base. Two accurately-ground slots ran down the length of the bed plate to provided a location for the "base keys" of the other accessories - while various other holes, slots and tappings were provided in the top surface and left-hand face to allow as great a versatility in their alternative positioning as possible. The result of this most thoughtful and carefully-considered design was a system that allowed items not only to be mounted in a variety of ways, but also attached, adjusted and removed relatively quickly - a great help when changing from one set up to another in order to work through a complex job that involved a sequence of turning, milling, grinding and drilling. Unfortunately, as with all multi-purpose machines, all was not perfect. The time taken to change from one set-up to another could be considerable, though if you were stranded on a desert island, or 500 feet down in the sea, that would not have been a concern so long as the machine could do the job - it was never intended for mass production. The base was, for its intended task, rather light and the method of locating critical components has been found, in practice, not to be sufficiently accurate or secure. One more annoying problem was the position of the vertical column; this was too far to the left with its verical axis falling not just in front of the lathe's spindle axis but also intersecting the headstock casting to the left of the spindle nose. Thus, it was impossible to drill into the centre of a workpiece set between the lathe centres or machine exactly along its length.
Another failing of the vertical miiling and drilling assembly was a tendancy to stick when moved and a lack of quill-feed graduations - making drilling and boring into blind holes difficult and requiring more time to be spend setting up of ancillary measuring equipment. Although not clear from the illustrations, the slides dispensed with conventional gib strips and used instead a rather dangerous method of adjusting out slack: a saw cut was made close to the V-edge, to allow some flex, and "gib-strip" adjuster screws used to "bend" the section inwards. Whilst the slides were well made, and closely fitted, careless handling of the screws, or undue wear and consequent overtightening, would cause the "flexi-bit" to break off, rendering the machine useless. Further comment from users of Hommel machines would be interesting.
|
|
|
|
|
|
|
|
|
|
|
|
|
|
 |
|
|
|
|
|
|
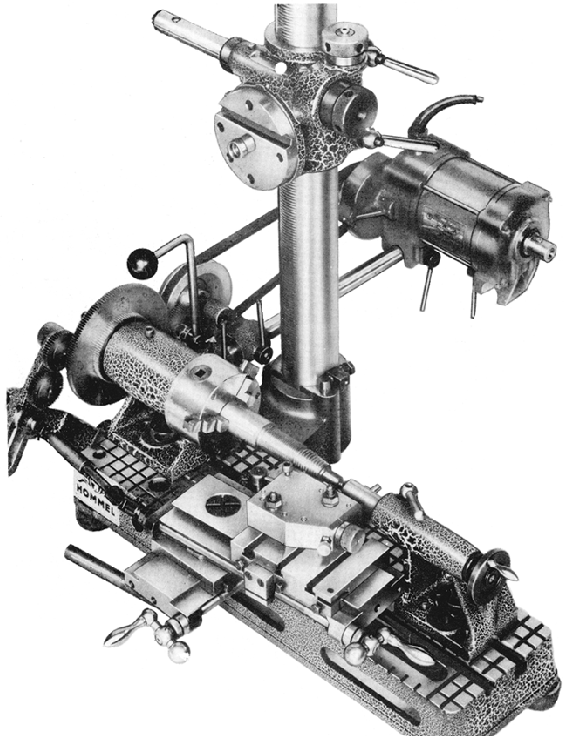
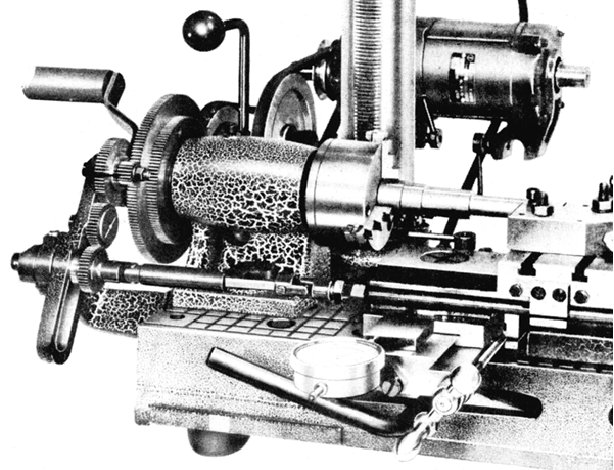
A early version of the Hommel UWG 1 set up for taper screwcutting with a special micro-adjustable tool holder on the top slide.
|
|
|
|
|
|
|
|
|
Continued:
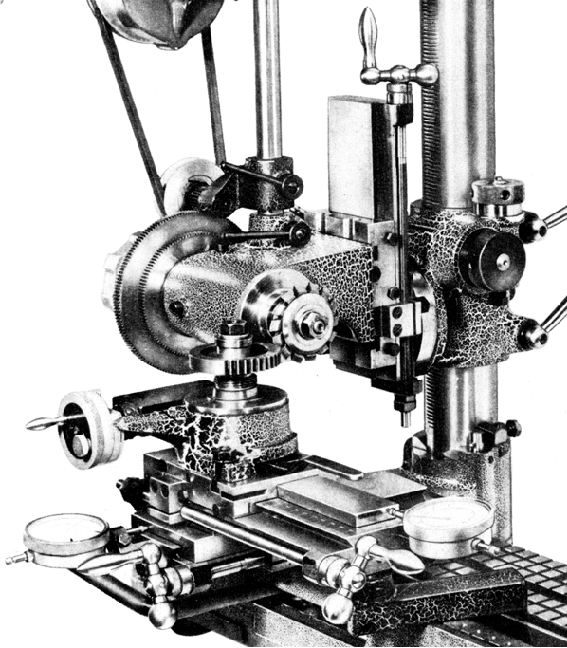
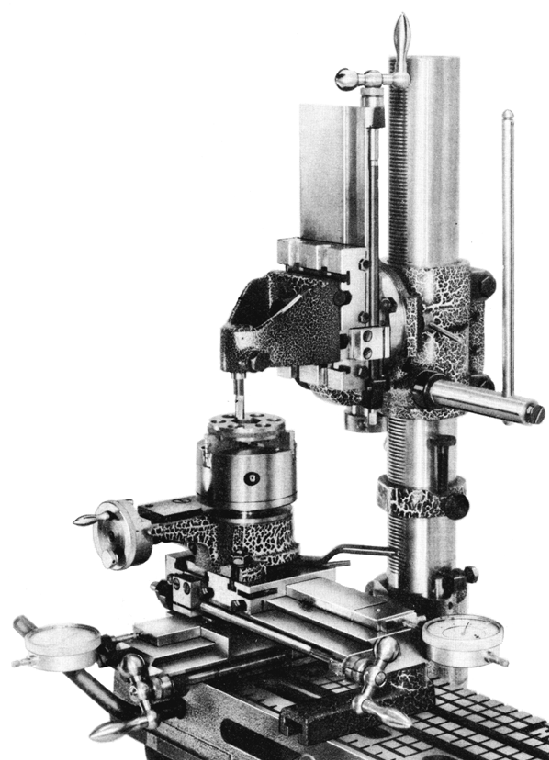
Made from a solid steel bar and finish ground the vertical column had a fine rack downs front surface (which was ground in, not machined) together with a guidance slot at the back to ensure that, as the housing was driven up and down the column, it did not loose its alignment. The arrangements for mounting and aligning the column were very well designed and easy to use; to ease fitting and removal the walls of the socket could be spread apart a little by removing one of the clamping bolts and screwing it into a tapping in the mating flanges between the two clamp-bolt holes; once the column was in place, it was pulled down firmly into the bottom of the hole by a round-headed, Tommy-bar bolt. For some operations, such as radial drilling, it was necessary to turn the column in its housing and to ensure that it was correctly and quickly realigned with the longitudinal axis of the base plate a bolt, that passed through a lug screwed into the side of the column, was made to abut against a short vertical bar that protruded from a hole on the side of the socket casting; by turning the bolt a small adjustment could be made to set the alignment exactly using degree markings that were engraved around the base.
An easy fit on the column though aligned to it the sliding head was prevented from turning, by a "guide key" secured with two screws; the whole assembly being firmly clamped to the column by two ball-ended levers. The head carried a rotating boss the face of which was machined with both a spigot to locate components centrally and an accurately-ground slot, across the width of its surface, to ensure that they were perfectly aligned on it; the boss was engraved with a complete circle of finely-engraved degree divisions.
Although the head was moved up and down the column by a simple, quick-action lever-operated rack-and-pinion mechanism, once a coarse setting had been achieved it could then be accurately adjusted into its final position by a very fine feed worm-and-wheel mechanism engaged by a metal-to-metal conical clutch; one revolution of the knurled-edge, micrometer-engraved, fine-feed handwheel moved the head assembly through just 1 mm. Owners report that repositioning elements on the column can be tricky, with components sticking before they move. Because the vertical-column housing was designed to accept almost all the standard accessories (and both types of drive motor) set-ups of great versatility were possible; for example, at one extreme, the tailstock could be mounted vertically and used, with a hardened point in its taper, for simple spotting out, punching and engraving while, at the other, with the headstock mounted on an auxiliary slide rest (and holding a collet-mounted grinding wheel, and the work beneath fastened to a T-slotted boring table on top of the table-mounted compound slide), almost any angle of approach could be set and the most complex of shapes ground to size.
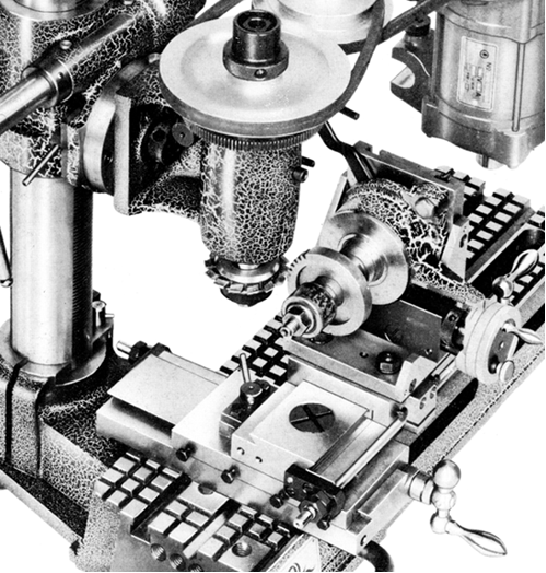
Contained a hardened and ground 16 mm-bore spindle the headstock was originally fitted with taper roller bearings, later changed to twin-track, opposed-thrust ball races, with both were capable of spinning at over 8,000 rpm; there was no Morse taper in the nose; instead, a solid draw-in collet with a centre formed on its end was used (a problem with Hommel collets is their lack of a slot to engage with a locating pin in the bore - why this design was chosen is a mystery, it was completely at odds with established practice). In order to allow the headstock to be positioned in the greatest variety of locations, and in unusual alignments, the drive pulley - a flat-belt when set up for grinding and a V-belt for other operations - was "overhung" on the outside the left-hand bearing. Immediately inboard of the drive pulley was a 120t gear that had to be left in place as part of the spindle structure (it being necessary to change it only when cutting threads of a certain pitch) and which was tapped on its outer face so that a handle could be screwed in and used to turn the spindle by hand for tapping and other slow-speed jobs. The spindle gear was driven by a small gear formed as the inner potion of the closest pulley pin; hence, with a train of pulleys in place to provide a slow speed the final reduction was by the two gears, not the belt.
Continued below:
|
|
|
|
|
|
|
|
 |
|
|
|
|
|
|
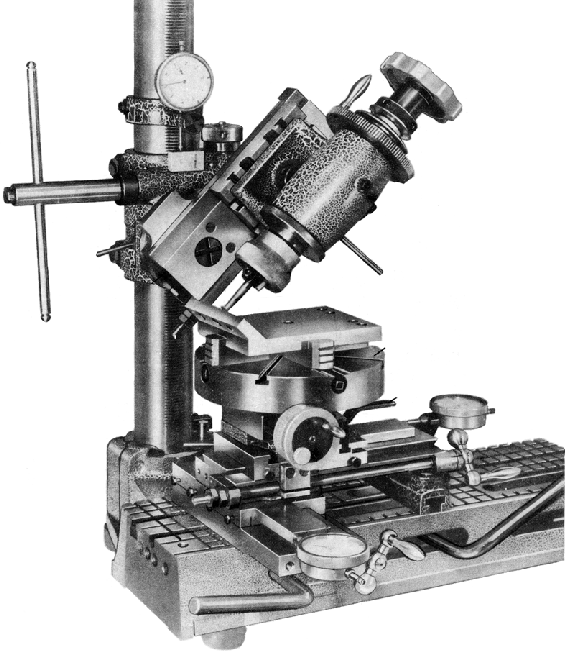
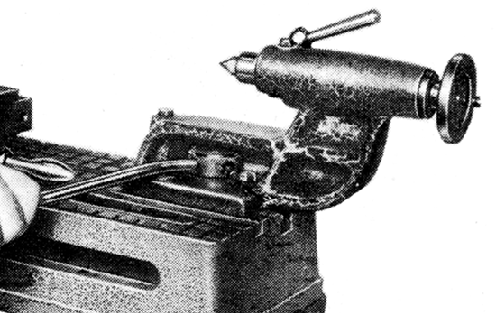
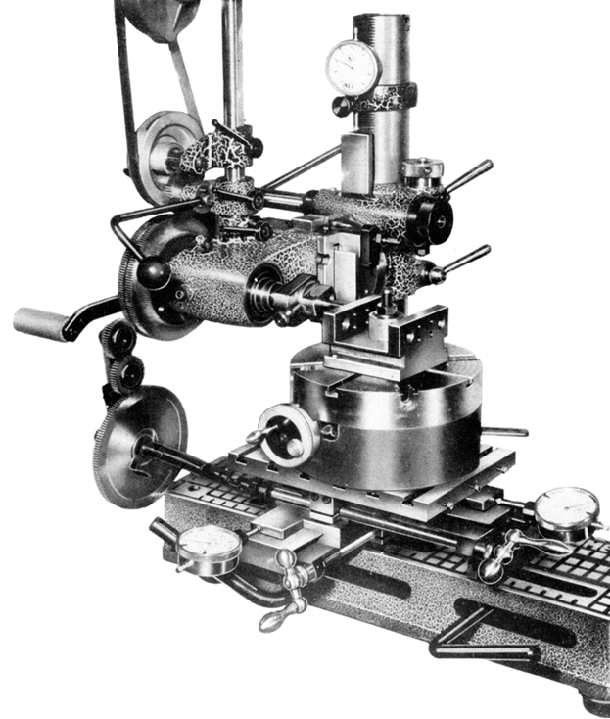
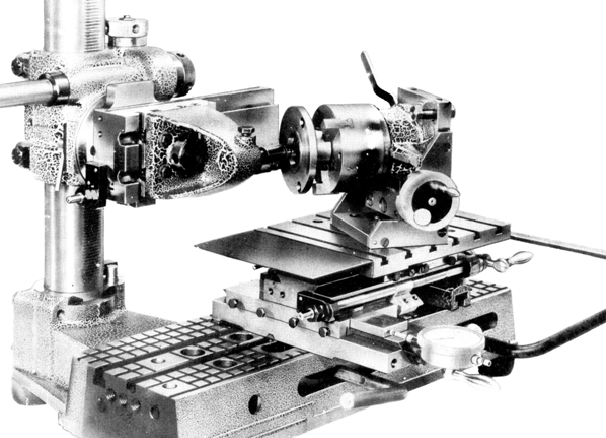
Hand tapping at an angle on the UWG 1: the headstock is mounted on the cross slide whilst the top slide holds the rotary table and 4-jaw chuck. Dial test indicators have been fitted to each axis of movement and a handle screwed into the face of the gear on the end of the headstock spindle.
|
|
|
|
|
|
|
|
|
|
|
|
|
|
Continued:
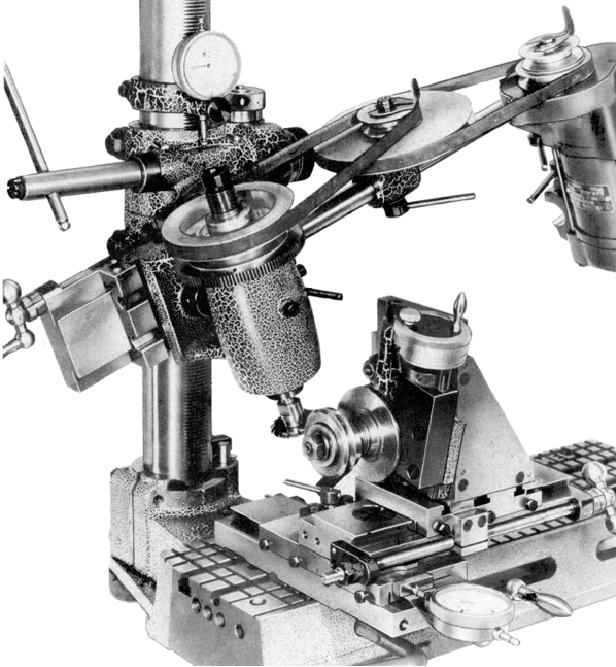
One of the main problems with "universal" machines - apart from those associated with their mechanical complexity - is that of providing a drive system able to provide the very wide range of speeds and torque necessary for the correct functioning of the different tools; grinding, for example, might need more than 8000 rpm, while screwcutting and large-diameter faceplate-mounted jobs only 25 rpm or so. Hommel's solution was to offer two distinctly different motors: the No. 113o/113oA and the "Universal" No. 1114/1114A With the drill-like No. 1114 in place, and connected to a two-stage V-belt countershaft assembly (mistakenly referred to by the makers as a "backgear", even though the final reduction was by gears) the motor could run the spindle through 18 speeds from 75 to 7385 rpm; however, by employing an optional-extra pulley set seven additional slow speeds down to 11 rpm became available - the complete range of 25 speeds being: 11, 15, 20, 26, 33, 44, 57, 75, 99, 129, 168, 221, 290, 379, 496, 650, 850, 1110, 1470, 1925, 2522, 3305, 4320, 5637 and 7385 rpm.
The 113o/113oA was a single-speed motor with shafts protruding from both ends; one was driven directly at 2860 rpm the other through a reduction gearbox with an output speed of 650 rpm; the motor was designed to be turned round in its mounting and was provided as standard with a built-in reversing switch to set the direction of rotation correctly for the particular accessory in use. 27 speeds were available: 13, 17, 22, 37, 40, 64, 84, 110, 140, 190, 250, 330, 430, 560, 740, 960, 1300, 1600, 2200, 2800, 3760, 4900, 6350, 8400 with a V belt and, for grinding (with a flat pulleys and a special, smooth-running silk-fabric belt) 4460, 5800 and 7750. Both motors could be fed with either European 50 Hz current or American 60 Hz; in the latter case all the speeds were multiplied by a factor of 1.2 and maximum spindle revolutions rose to 9300 rpm.
Able to be mounted in a number of different ways the motor(s) were usually carried either on the vertical head, or by a solid steel bar protruding from the back of the headstock that passed through an open slot cast into each of the motor's end plates; this arrangement allowed the motor to be revered in its mounting and (together with a selection of longer and shorter V belts) aligned with the headstock; the whole assembly could then be maneuvered into position to give clearance for the job in hand. The bar could also carry a single or double-reduction countershaft unit that was quickly assembled by using the open slots cast into the side of each pulley's bearing housing.
Although, given the unusual concept of the Hommel, a proper full-length leadscrew would have been an impractical fitting, the lathe was still able to generate threads and provide a powered feed to the toolslide, although the two functions were quite separate and activated in different ways. Screwcutting was by a train of changewheels, mounted on a slotted bracket bolted to the left-hand end of the bed, that drove a telescopic shaft with universal joints connected to the top slide. If the slide had to be positioned towards the tailstock end of the bed, two extension drive shafts were supplied to make up the connection. To get the best out of the machine when generating threads the optional very slow speed-drive assembly would have been a desirable accessory - the standard bottom speed of 75 rpm (at least as specified for the UK market) being a little too high for safety when threading to a fixed length, up to a shoulder - or into a blind hole. For the generation of coarse threads, a handle and crank arm were supplied to attach to the face of the large gear on the headstock so the assembly could be turned by hand. Pictures of the screwcutting arrangements can be seen at the bottom of this page. The power-driven fine-feed arrangement did not use the changewheels - instead a wonderfully neat and compact 3-speed oil-immersed reduction gearbox was fastened to the top surface of the base plate and driven directly from the large gear on the end of the headstock spindle. The drive from the box, which was taken to the top slide by the same shafts used for screwcutting, could be instantly engaged, disengaged or reversed by a lever on the front face of the box - while the output speeds (of approximately 0.0034", 0.004" mm and 0.006" per revolution of the spindle) were selected by a 3-position push-pull knob that emerged from the box's left-hand end face.
One of the limitations and compromises inherent in keeping everything as compact as possible can be seen in the design of the compound slide rest where, in order to keep the height as low as possible the feed screws, instead of being underneath and central on each slide, were positioned along the sides. Under hard use, leverage from the screws tends to twist the slides - a theoretical disadvantage that was overcome by ensuring the "split-casting" gib blocks were correctly adjusted and the slides set up with a firm feel to their action (though as previously mentioned, the gib strips posed yet another problem, making contact along the just bottom of their face). The feed-screw micrometer dials were also very small - although it appears possible that they could have been made larger without difficulty. Like many good-quality precision bench lathes the slides of the compound rest were engraved with ruler graduations for measurement of linear travel.
Two tailstocks were offered, both with No. 1 Morse-taper spindles; one was an ordinary unit while the other had its upper section (containing the barrel) cantilevered away from the headstock to increase the between-centres' and drilling capacity.
As a final touch, because the base was ground flat to fine limits the makers suggested that it could also be used as a marking out and surface table and listed various scribing blocks and angle plates to use for this purpose - all the items being produced by Hommel themselves as part of their general tool range.
Original paint for the Hommel might still be obtainable from this source.
A well-written and detailed account in German) of the background to these machines can be found here - or, if that automatic translation does not work, here..
|
|
|
|
|
|
|
|
|
|
|
|
|
|
|
|
|
|
|
|
 |
|
|
|
|
|
|
|
|
|
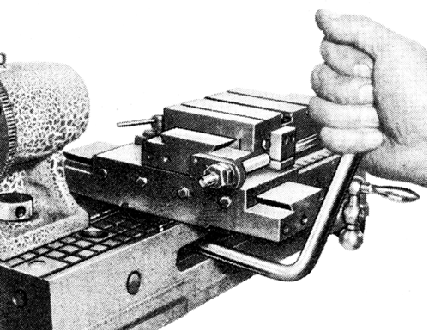
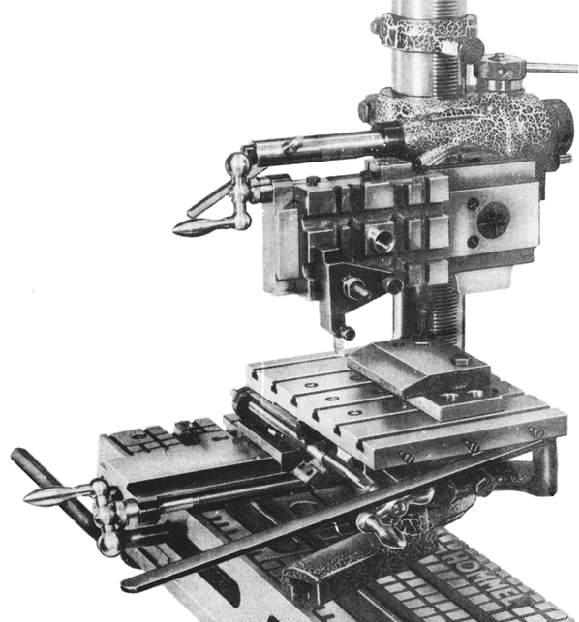
The quick-action lever used to tighten accessories and fittings to the bed
|
|
|
|
|
|
|
|
|
|
|
|
|
|
|
 |
|
|
|
|
|
|
Special "cantilevered-back" tailstock to extend the capacity between centres
|
|
|
|
|
|
|
|
 |
|
|
|
|
|
|
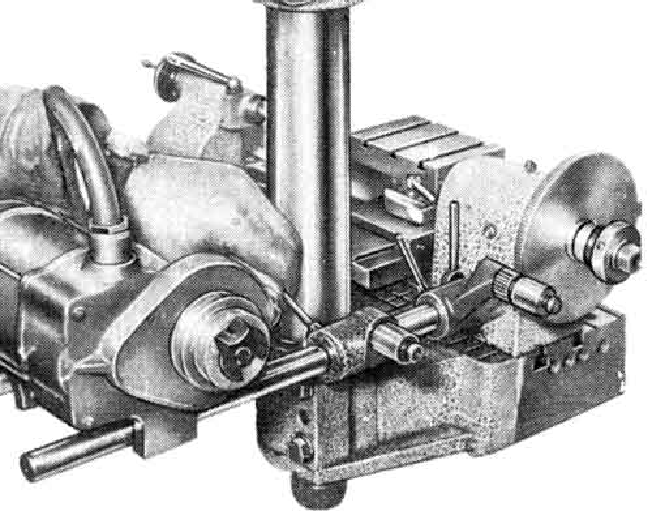
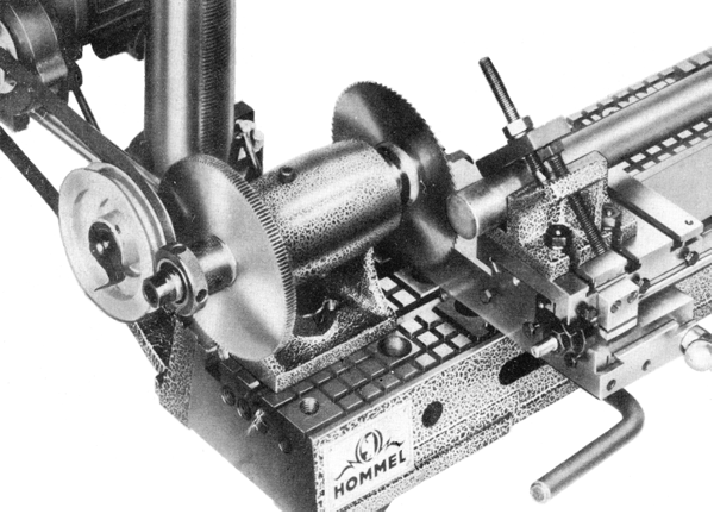
UWG 1 - a picture showing the motor with a speed-reducing gearbox on its end and the countershaft arm with the pulleys removed; the final drive to the gear on the end of the headstock spindle was by a small gear formed as the inner potion of the nearest pulley pin. By combining the various sets of motors, standard and optional-extra pulleys and final gear drive the speed range could be made to span an impressive 11 to 7385 rpm. The hole between the two column clamping bolts was tapped - and designed so that a bolt screwed into it forced the socket walls apart slightly to allow the column to be more easily inserted and removed.
|
|
|
|
|
|
|
|
|
|
|
 |
|
|
|
|
|
|
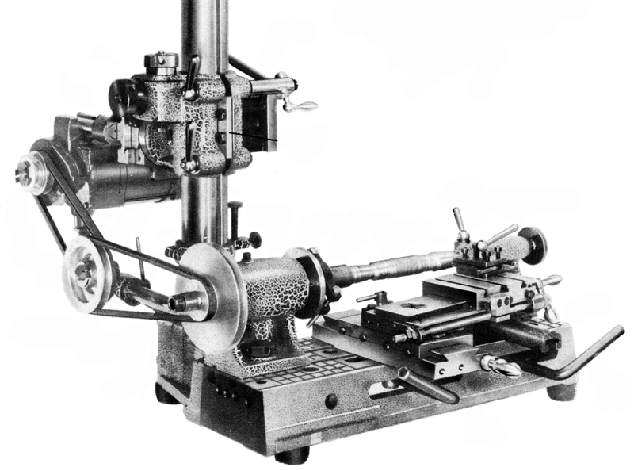
The Hommel UWG 1 set up for simple turning work and driven by the 113o/113oA single-speed motor with a shaft protruding from both ends; one shaft was driven directly at 2860 rpm the other fed through a reduction gearbox with an output speed of 650 rpm; the motor was designed to be turned round on its mounting and was provided with a built-in reversing switch to set the direction of rotation correctly for the particular accessory in use.
|
|
|
|
|
|
|
|
|
|
|
|
|
|
 |
|
|
|
|
|
|
UWG 1: Standard lathe work but from a drive with an intermediate pulley
|
|
|
|
|
|
|
|
|
|
|
 |
|
|
|
|
|
|
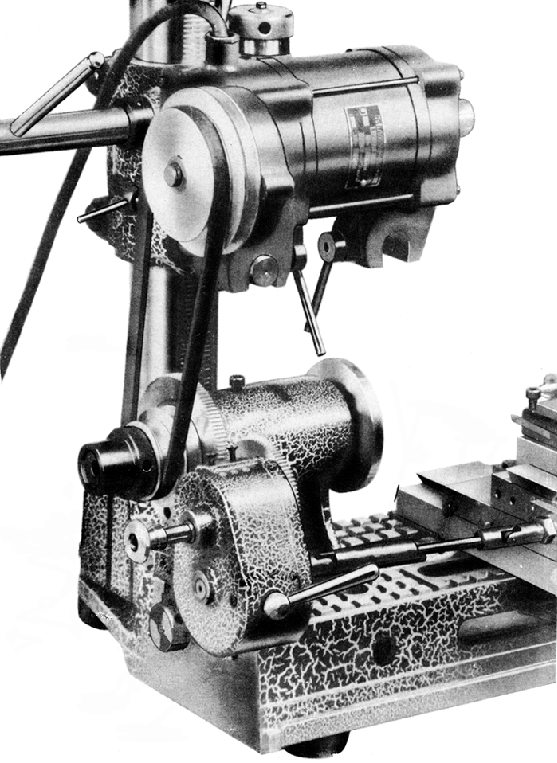
UWG 1: Yet another variation on the fitting of the double-spindle 113o/113oA motor, this time with a two-step pulley. The top-slide feed gearbox bolted to the lathe base plate was a wonderfully neat and compact, 3-speed oil-immersed unit driven directly from a large gear on the end of the headstock spindle. The drive from the box, which was taken to the top slide by the same shafts used for screwcutting, could be instantly engaged, disengaged or reversed by a lever on the front - while the output speeds (of approximately 0.0034", 0.004" mm and 0.006" per revolution of the spindle) were selected by a 3-position push-pull knob which emerged from the left-hand end face of the box.
|
|
|
|
|
|
|
|
|
|
|
 |
|
|
|
|
|
|
UWG 1: Screwcutting was by a train of changewheels mounted on a slotted bracket bolted to the left-hand end of the bed. The gears drove a telescopic shaft with universal joints connected to the top slide. If the slide had to be positioned towards the tailstock end of the bed, two extension drive shafts were supplied to make up the connection. To get the best out of the machine when generating threads, the optional very-slow-speed drive assembly would have been a desirable accessory - the standard bottom speed of 75 rpm (at least as specified for the UK market) being a little too high for safety when threading to a fixed length, up to a shoulder or into a blind hole. For the generation of coarse threads, a handle and crank arm were supplied to attach to the face of the large gear on the headstock so the assembly could be turned by hand at slow speed. The vertical bar with the black knob on top was used to engage and disengage the feed.
|
|
|
|
|
|
|
|
|
|
|
|
|
|
|
|
|
 |
|
|
|
|
|
|
The Hommel UWG 1 set to cut a horizontal thread in a jig using hand power.
|
|
|
|
|
|
|
|
|
|
|
 |
|
|
|
|
|
|
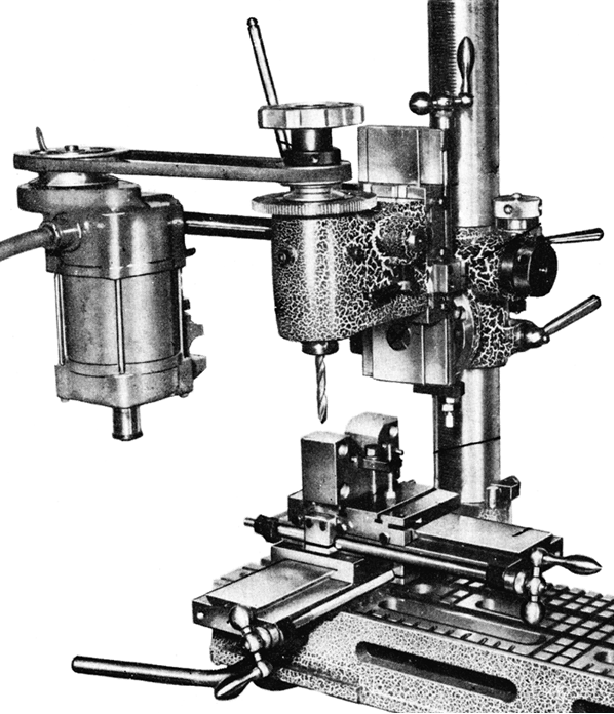
UWG 1: Because the vertical-column housing was designed to accept almost all the standard bed-mount accessories, and both drive motors, a set-up of great versatility could be created: for example, above, with the head mounted on a screw-feed slide both a rapid and sensitive feed were available at the same time.
|
|
|
|
|
|
|
|
|
|
|
 |
|
|
|
|
|
|
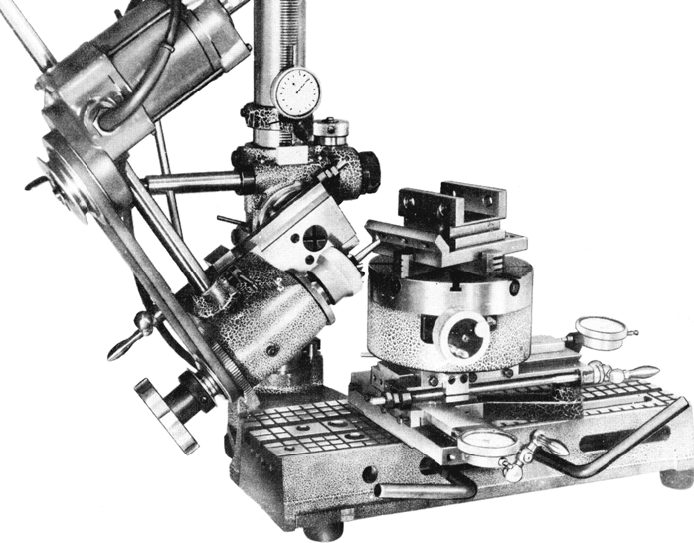
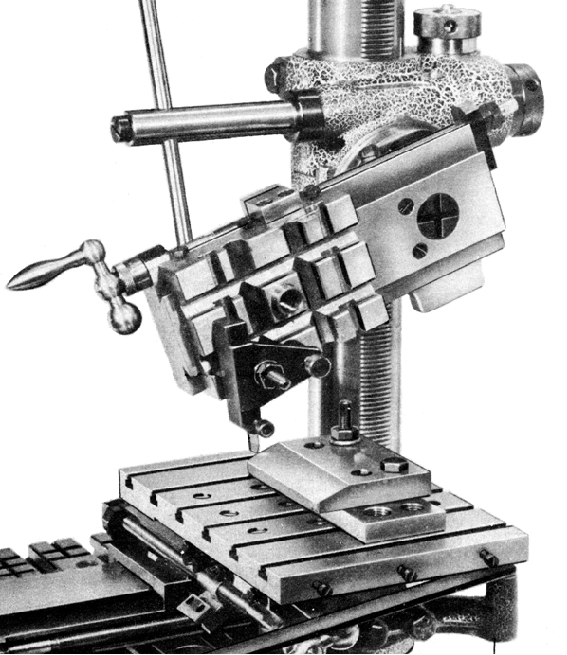
UWG 1: A good example of the complex work that a Hommel was able to accomplish - a complex jig-boring operation with the job mounted on a rotary table (surmounted by the 4-jaw chuck) and the head approaching at an oblique angle.
|
|
|
|
|
|
|
|
|
|
|
|
|
|
|
|
|
 |
|
|
|
|
|
 |
|
|
|
|
|
Above and left - the Hommel UWG 1 set up for a form of radial drilling where the column has been released from its clamp and allowed to rotate. Mounted on the compound slide rest is the maker's T-slotted boring table.
When the job was finished, and the column had to be returned to its central position, a bolt was turned against a stop to set the alignment exactly using the degree markings engraved around the base.
|
|
|
|
|
|
 |
|
|
|
|
|
|
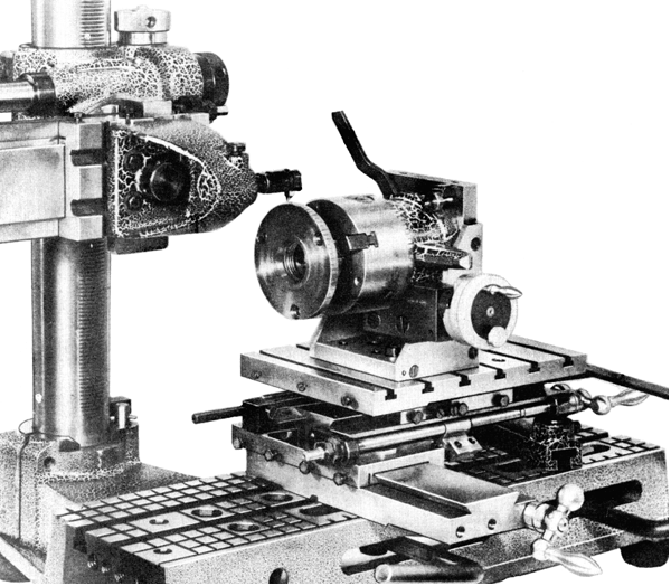
UWG 1: Cutting a spur gear mounted vertically, with the rotary table mounted on an angle plate, and the cutting feed arranged to act horizontally from the top slide
|
|
|
|
|
|
|
|
|
|
|
 |
|
|
|
|
|
|
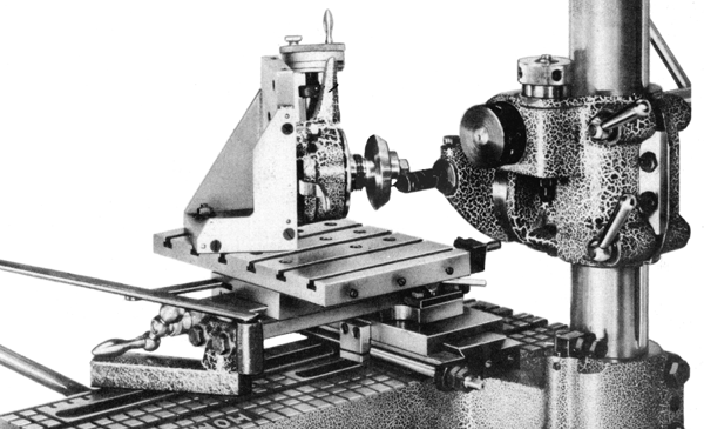
UWG 1: Milling a spur gear in the horizontal position with the rotary table mounted directly on the top slide and the cutting feed arranged to act vertically from the head. Dial test indicators have been fitted to each axis of the compound slide to assist with micro adjustment of the depth of cut.
|
|
|
|
|
|
|
|
|
|
|
|
|
|
|
|
|
 |
|
|
|
|
|
|
UWG 1: Milling the wheel from a worm & wheel assembly - a job made easier by the multiplicity of settings available from the accessories in use.
|
|
|
|
|
|
|
|
|
|
|
 |
|
|
|
|
|
|
UWG 1: Milling an angled rack using the top slide set over at an angle. The final drive from the countershaft to spindle is by gear.
|
|
|
|
|
|
|
|
|
|
|
 |
|
|
|
|
|
|
UWG 1: By using the vertical head rack feed and mounting a chuck on the rotary table it was possible to cut not only keyways but, squares and hexagons, etc.
|
|
|
|
|
|
|
|
|
|
|
|
|
|
|
|
 |
|
|
|
|
|
|
UWG 1: Horizontal slotting was also possible if the optional; table lever feed was used - the flat operating lever for which can be seen at the right-hand end of the table
|
|
|
|
|
|
|
|
|
|
|
 |
|
|
|
|
|
|
UWG 1: Traditional shaping work with the aid of a lever-feed top slide
|
|
|
|
|
|
|
|
|
|
|
 |
|
|
|
|
|
|
UWG 1: With the tool slide set at an angle it was also possible to shape an angled surface
|
|
|
|
|
|
|
|
|
|
|
|
|
|
|
|
|
 |
|
|
|
|
|
UWG 1: Put away your hacksaw - with the gear final drive in place to help transmit the required torque, the Hommel is used to accurately saw to length a steel bar. For heavier-duty work the tailstock could be employed to support the other end of the bar.
|
|
|
|
|
|
|
|
|
|
|
 |
|
|
|
|
|
|
UWG 1: Engraving the rim of a backplate using a lever-feed top slide and rotary table
|
|
|
|
|
|
|
|
|
|
|
 |
|
|
|
|
|
|
UWG 1: With the slides and head set correctly the face of a cone is engraved
|
|
|
|
|
|
|
|
|
|
|
|
|
|
|
|
|
|